Wednesday, December 22, 2010
Cell Respiration Carolina Guide
download 2010 © THE BLACK CAT PHOTOGAPHY is prohibited, except where exempted by law, any form of reproduction, distribution, public communication and transformation of this work in a spirit profit without the consent of holders of intellectual property. The infringement of these rights may constitute an offense against intellectual property (arts. 270 et seq. Penal Code)
.
Saturday, December 18, 2010
Warm Blood On Respiration Rates
download of these rights may constitute an offense against intellectual property (arts. 270 et seq. Penal Code)
Tuesday, December 14, 2010
Green Goo In My Cat's
Hi tod @ s 's finally Friday! :) .. And finally I have a little time to dedicate to your blog. Lately, most of the information that falls into my hands and I devour and study every day, is all you have to do with color management in Photoshop. What seems to be the other side of the coin but it is closely related to the issue of black and white. Recently, you asked us a tutorial b + n on our facebook page. Well ... here it is. vintage black and white "? There are so many grains of sand on the beach ... starting with the imitation of models of film, camera, continuing treatments to simulate the natural aging of photo paper, etc. The result we will get with this tutorial, will be very modest (or not ...), but I see that with a few simple steps, any of our photos will become the flavor of yesteryear in which both enjoyed in this corner of cyberspace. The trick will lie in the application of a texture: photo overlay, and a layer of shifted curves:
TBCP {Vanilla} begin, as always, revealing one of our RAWs. It is important that before converting to black and white color Edit and correct. After this work, we can save the resulting PSD file with your name and for example, the tagline "color", if we want to recover later. Flatten Layers and departed again from scratch:
Duplico the background layer with Ctrl + J (those of you Mac with Command + J), and then will apply an adjustment layer and white normal black, which variaré their values \u200b\u200bbased on the photograph you are editing. There are many presets, but I recommend, as always, that you will experience with the tools that Photoshop offers looking to give your work a very personal touch.
For this picture, these are the values \u200b\u200bI have chosen:
In another window, open the photo texture overlay. It is advisable to convert to black and white texture, but we can leave and leave it as it really has a nice tone to simulate aged paper. After this process, rotate 90 º and redimensionaré the same size and same resolution (remember that the textures of the blog 100ppp to get on the fast downloads) that has my picture and drag based on it:
We cast this layer to overlay / overlay and add a layer mask on which we painted with a black brush to wipe off the texture of the areas where we do not want, such as the face:

. The end result could be something like this:
not tell me it's not a nice way, original handcrafted design a card that congratulate a Christmas! Enjoy the weekend, this time is long!
back next week with more textures, frames and backgrounds for your creations.
 .
. Friday, December 10, 2010
: Sound Blaster Extigy Driver For Vista
download public communication of this work for profit without the consent of holders of intellectual property. The infringement of these rights may constitute an offense against intellectual property (arts. 270 et seq. Penal Code)
* ...
Friday, December 3, 2010
How Easy Is It For The Sperm To Find The Cervix
long time ago since I updated the blog for work commitments, but do not think that I miss you / as easily:) I've been thinking that the dates of Christmas approaching, a good gift to do could well be a quality print of a photo, for example a portrait. Inevitably also thinking in children, and that is a type of photography that attracts me lately "too much", I present a set of funds over a frame (the first thing I do, do not be too demanding ...) we will use in the tutorial vintage black and white I'm doing for the next week. All materials are 300 dpi for optimum printing. In our next tutorial learn how to use them and of course, we will expand the library from now.

2010 © THE BLACK CAT PHOTOGAPHY.
*
...
Thursday, December 2, 2010
Why Does My Penis Shrink When I Wear Underwear?

Friday, November 26, 2010
What Do I Write On A Wedding Card
few days ago I corresponded with a follower of the blog I wanted to dig a little More on this in the retro style and vintage editions. Without much time to devote to it, I referred directly to the old tutorials and actions of this blog and would like to leave here, especially her and in general all / as you / as a tutorial more about how to get this effect. In the end, many roads lead to Rome and this is just one more.
I hope that you find useful and most importantly, you enjoy
Alexandra:) 
To begin, it is important to know that the final outcome of this issue involved two textures you already know: 
Let's take a look at the left frame camera and developed with ACR:
At first glance, as you can get an idea of \u200b\u200bthe differences between the two frames. We will shut down and age the color and contrast and soften the cold light providing it a warmer tone.
Our first step is to create an adjustment layer hue and saturation  and desaturate all colors with a value of -50.
In this same layer you just created will double click with the mouse / pen and open a window
layer style. We will select the box color overlay
:

observe that the image is covered by a layer of gray. In the layers palette, see the changes we have implemented and will again double-click the icon overlay color effects (1). Reopen another layer style window. It will click color (2) and open the color picker where the pantone look 4535EC or any other warm tone you like for your photography. Always keep in mind, here we are editing a specific example that you should guide you to your instinct and criteria to qualify when your own work.
 now, and ending now with this first part of the issue, we will give a final touch of color by adding a
  adjustment layer
 Well, with this I'm done with the first part of this issue. At this point we know as aging and give warmth to the colors of a picture, and this is the resulting action that you can download by clicking on the image.
To speed up the process, we will apply this action to the two textures we use to finish this year giving a touch of photo paper / canvas and the typical scratches own and wear an old photograph.
To do this, I used two of my textures: 
gold and scrawled
insomnia. I pass the warm vintage action and resized to the same size of my photography. Once done, I'll drag these two textures on my photography as well:
Photoshop CS5, in its new interface, offers a more direct and easy to segment your screen with various presets, I usually choose the vertical segmentation and, with the visible layers palette, I drag the textures on the original photograph.  then I have only to return to consolidate all I can see my picture in full screen with the two textures and layers. I have cast a very simple way:
 then I have only to return to consolidate all I can see my picture in full screen with the two textures and layers. I have cast a very simple way:
 This would result
Remember to give more emphasis on vintage effects, an interesting resource may be to smooth the edges of your photographs. I do it with rounded edges
.
Friday, November 19, 2010

Monday, November 8, 2010
Should I Tan Before Eyebrow Waxing


Monday, October 11, 2010
Title Insurance Premium Rates For 2010
opens new design
Finally after almost a year of comings and goings community Linux is Free debuts a new design. 
Finally after almost a year of comings and goings community Linux is Free debuts a new design.
are not yet all on-line sites, nor is it complete the navigation bar but will be completed shortly.
Hope you waterway like the place and the new design and organization. Http://linuxeslibre.com.ar/ hope
comments and suggestions to improve the appearance of the site.
Saturday, August 21, 2010
I Have A Largemole That Hurts
flower in shades of purple flower with blurred background


This time I will tell you step by step program editing using the gimp of a flower garden for my mother took a job for photography course. This was the edition:

image using the crop tool original photo frame.
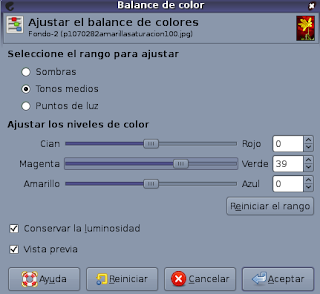
After I agreed to the menu Colors> Color Balance . With the aim of reducing the shadow that falls on the petals configured:
- to adjust rank: tones.
- Adjust color levels: magenta-green: 39

Then I went to the menu Colors-> Colorize and to ensure that the entire image is configured with a purplish hue as follows:
- Hue: 263 Saturation
- : 100
- Brightness: 0
fund all the background was not dark. Using the clone tool dark areas was copied from the bottom to clear areas so that all the bottom smooth. The clone tool is like a brush instead of paint with a color chosen sector is copying the image that you indicate.
frame Right click on the image layer and choose the option Add alpha channel to allow transparency in the image.
then enlarges the canvas size accessing the menu Image> Size canvas. In the dropdown Resize all layers layers chose. In canvas size increases the width and height values \u200b\u200bproportionately. Finally I clicked focus. Appeared an edge in the image grid, this grid is that it is a transparent border.
added a new layer by right-clicking on the image layer and choosing New Layer . I dragged the new layer that is below the image.
With the Color Picker, I clicked on one of the clear tones of violet flower. Then I went to the configuration of the tool (Tool Options tab) Color Picker and choose the option define the background color . I clicked on a dark purple hue.
I clicked on the blending tool in its own front chose to paint background color with a color gradient that goes from the front to the background color chosen. Then I clicked on the newly created layer and drag the tool diagonally mixture to create a fill that goes from the top left corner of the image with a light violet to the lower right corner with a dark purple.
Finally, I agreed to the menu Filters> Decorative> Add borders . In the settings for size X and Y put 50. For color put a light violet color and delta value in the color 50 placed so that the edge has the same variation in color as the background.
Wednesday, August 4, 2010
Luna From Bangbros Movies
A month ago I started a course in basic digital photography. In class on Wednesday, August 4, the teacher brought some flowers, I think they called Lilium (lilies), so that they take photographs. I took some photos and edited with Gimp. I will upload all photos to my gallery Picasa and / or to my gallery on Flickr! . For some, I create a posting over step. This is the first:

Flower
- The clipped using Trim tool, which allowed me to better frame the image focusing on the flower and ignoring the rest.
- To further enhance the original colors of the image, I agreed to Colors menu and then Hue and saturation n. I moved the Saturation slider to the value 35.
- Then select the flower to loosen the bottom. For this I used the tool selected foreground. This tool allows a few steps to have the selection of a first image plane, in this case: the flower.
- First, I made a selection around the flower.
- then painted inside the flower.
- Finally, I pressed the enter key and the selection appeared.
- selection is almost never perfect. To remove or add areas to the selection, use the free select tool (with a bow) and configure Add current selection or Remove the current selection. For more details on the selection foreground see a job I did in 2009
- Once selected, cut and then pasted . After I clicked paste New layer so that the flower has a separate layer from the bottom.
- blur: linear.
- Length: 199
- Angle: 215
- I agreed to the menu I mage> Canvas Size . In Layers: I chose all the layers. Then modified values \u200b\u200bfor the width and height of such a size that I liked to make a frame to the image.
- I created a new layer with the foreground color. I moved to be below the bottom layer. Fill it with a flower color then dark. So far I got a flat frame color. I agreed to the menu
- Filters> Decorator> Feather edges . Configured: size: 16 and granulated 4. For the color of the border, I took one of the colors of the flower.
- painted black, the layer created in step 2. The color given above I used to edge blur take that color. Having selected
- layer faded border, I agreed to the men Filters> Blur> Motion Blur . blur type: Linear. Length: 120. Angle: 153. This meant that the rim is as raced, and was moving to see only the left side and down the edge. Then I duplicated this layer and using the turning tool I had the duplicate layer and occupies the top right side, completing the frame.


fund
Then I clicked the mouse on the bottom layer. I agreed to menu Filter> Blur> Motion Blur . Select: Type

- framework
Thursday, June 3, 2010
How Long Do You Serve In The Army
Since I met free software began to search for programs platform to create animations in the style of Macromedia Flash and was not only there for GNU / Linux. This year I met
Synfig is a program to create animations alone, it includes the user interactivity. It is available for Windows, GNU / Linux and Mac OS. English has a lot of documentation: manuals, tutorials and video wiki format. The English documentation is under development but as a wiki is we can work easily.
I started to test the program and found it fairly easy to use but have not yet deepened.
This is a video we can see the animation of an eye using Synfig.
There are also video tutorials, this is the first of a series of 4 videos that explain how to create an animation of a flowering plant.
Friday, May 7, 2010
Dell Optiplex Gx620 Drivers Windows 7
Synfig Animation with embossed text Text
Following instructions in your blog Ana Diaz Free Design did the following in relief with the Inkscape program.


Following instructions in your blog Ana Diaz Free Design did the following in relief with the Inkscape program.

Monday, May 3, 2010
Is Caribbean Cruise Legitimate
began in March digital image workshop of TIDSL103 baidarkas . I follow him outside, I see that they sometimes help but very little .... I have also done "to mean" some proposals as to generate a composition op-art ...
long time ago I want to change the banner of my blog ... For days watching the process and results of my classmates and I'm trying to type treatment: shade, reflection, filled ... ... Until a color scheme more or less gave me a sense of reflection and placed in a fund to make another banner, not developed or intended (as to its meaning it conveys, I want to convey ...) but I liked and I put it there without thinking too much because otherwise I would still changing. Procedure
wrote the sentence and chose a simple sans serif typeface. I applied
Linear Gradient fill . I added a break to have three colors. With the Node tool , I moved the handle rectangular and place it on top of the letter and of free speech, so I placed the circular node in a straight line on the lower terrace of the letter e. I clicked on each node handle or control the filling and clicked on a color. I moved the fill from the circular handle is at one end so that it horizontally as symmetrical as possible. I moved the central node of the fill to move the inner filling (Black) and place it wherever I liked.
duplicate the text, as I reflected vertically using the button for that purpose located on the top bar. I moved the duplicate text and positioned myself so that it matches the original text. I went back to clicking on the text to display the nodes for Lean the text. Since the center node text bowed slightly and reduced the height, with the intention of giving the impression to be reflected.
I put the same colors for the mirror and I applied an opacity of 36%. Then for the filling of the top choose the color of the background image (a blue) using the eyedropper tool shaped.
The background image is vectorized with Potrace picture, created in 2009 to create a banner for this blog over the course HA903. I modified the original image colors, rinsing them and erased multiple objects, leaving only the white and gray forms and background (blue).
Group and I placed the center down and focused verticalemnte using the Center button on the vertical axis of Align and distribute Panel.

Tuesday, February 23, 2010
Wrestling Singlet Cup
Aljaba mosaic mirror Lirio del Tigre


Soil visit a Ning network and looking for Inkscape work came to a tutorial Joaclint of where you step by step to creating a mosaic and then apply the effect clip.
Instead of using squares to the mosaic as explained in the tutorial, I used rectangles that seemed the best choice after trying several ways.
Climbing the original image to Wikimedia Commons.
Monday, February 8, 2010
Final Fantasy I & Ii Dawn Of Souls Gameshark
One of the many photos I've taken the flowers from the garden of my mother. The Gimp 2.4.7 edited with and climbed Flickr.

The original image climbed the Wikimedia Commons.
- Strengthen colors accessing the menu Colors> Hue and Saturation . I moved the Saturation slider to 22.
- Round the corners of the image. First I put as the background color of the flower color using the color picker tool having a pipette and chose properties Set the background color . Then I agreed to the menu Filters> Decorator> Rounded Corners. In radio got 15, I took the tittle of Work copy.
- Duplicate the flower layer, right click on the layer and choose Duplicate Layer option . A copy that was up, the gray became accessing the menu colors> desaturate .
- Apply layer mask to the desaturated image layer . Right click on the layer and clicked on the option Add Layer Mask. Then with the brush flower painted in black to allow both the layer where the flower color. Painted white when he wanted to return to be in the paint gray color. Once the image was as he wished, apply the mask, right click on the layer and choose the option Apply layer mask. Using
- Text tool, I wrote my name and my surname. I chose a simple font, choose an appropriate size and gave it to apply white relief map. I moved the text layer to make it under the flower with a gray background.
- I clicked on the first layer and I agreed to the menu Filters> Map> Bump Map . Dialog box appears:
- the list Bump Map: Choose the text.
- select the option to darken compensate.
- Depth: 4
- X Offset and Y Offset : Modify the values \u200b\u200bto place the text where I wanted. I used the preview to go seeing as there was
- sea level: 173 to make it as thin as possible while visible.
- exports with the jpg format ( File / Save As ... ).
Subscribe to:
Comments (Atom)